Windows 10 Sandbox

Part application, part virtualisation, the Windows Sandbox enables a user to generate, a base Windows 10 machine, isolated from its parent physical/virtual machine.

The machine can then be used safely to test applications temporarily setup apps etc, and when done with can be raked clear (physically destroyed) all without impeding the setup of the originating machine.

Is a sort of half way house between Windows 7 Virtual machine, and a hyper V machine quickly created, but not a permanent feature. If you want something that you can use time and time again then Hyper V manager and a VM configuration is more to your needs than this solution.

Prerequisites

Sandbox will require you to have Windows 10 Pro/Enterprise version to use the feature, and will require hardware virtualisation already being configured (Hyper V).

Need minimum of about 4GB of RAM (as always recommend 8GB) with a min of 1GB disk space available ideally SSD for speed but HDD will work fine.

Checking Virtualisation is enabled

Run Task Manager and click the Performance tab you should see Virtualisation: Enabled under the CPU Graph(s)

Nested Virtualisation

If you wish to run Sandbox within an existing Virtual Machine (ensure its 64bit) then there is a further step you will need to take of  turning on nested virtualization. Launch PowerShell in  the VM and then enter the following command:

Set-VMProcessor -VMName <VMName> -ExposeVirtualizationExtensions $true

With nested virtualisation switched on (if required) you are good to go and continue to enable/install the application.

Enabling Sandbox

The feature like so many Windows features is not turned on automatically you will have to enable the feature so from the search enter Windows features (you could use Control Panel, but as that changing nearly every release!) and click on the link that appears like so:-

And ensure that you tick the check box for Windows Sandbox

Click OK and let the system install an update the application to your setup

Running Sandbox

Once installed you need to Search for the application Windows Sandbox and click on it (some folks advise right clicking and running as administrator. I didn’t need to do that as my account is admin of the machine)

After a short while a screen will appear showing a very basic Windows 10 installation, with no desktop wallpaper or previously installed icons, as said this created a fresh Windows 10 machine with its own IP address etc.

with its own IP address etc.

You will be able to drag and drop installers applications etc onto the sandbox and safely install and test.

Once you have done with the machine if you click the close app button. Or, select the Shut Down option from the start menu of the sandbox machine you will see the following message :-

Reminding you that once closed all your work, installations etc that have been done in the sandbox, are going to be destroyed permanently.

That’s all there really is to it

Clearing the foggy/blurred Login Screen

Just a personal bugbear on mine, but when you login on the Windows 10 1903 release the screen blurs the screen image behind it, as shown below. At my age I have enough trouble with blurred vision, and find this “fogged up” view a slight annoyance so here’s now to sharpen the focus back on the login screen.

fog1

You will need to launch the registry editor, and navigate to the following location

HKEY_LOCAL_MACHINE\SOFTWARE\Policies\Microsoft\Windows\
In the left pane, right-click on the Windows folder, and look for the System folder, if there isn’t one then click New, and then click Key. Name the new key System.

fog2

Now, on the right side, right click on an empty spot, click New and then click DWORD (32-bit) Value and then name it as DisableAcrylicBackgroundOnLogon

fog6

Finally, double click on the newly created DisableAcrylicBackgroundOnLogon value and set the value data from the default 0 to 1 to turn off the login screen blur effect.

fog5

Your should be able to set the blur back on (if required) by setting the value back to 0.


Clearing Timeline Activities in Windows 10

Timeline is a feature extending the original Task View in Windows 10. Timeline activities are linked via your Microsoft account with the cloud, enabling you to browse through your past activities and continue your work from where you left off, On any other Windows PC connected to your Microsoft account. Helping you get back in time to resume your work whatever device your using.

This means if you’re like me, hopping about from machine to machine with the Timeline tracking all the apps, files, and activities on your PC, that you can quickly build up a lot of detail that becomes clutter in your time line. You may want to clear an activity or a set of activities from your Timeline after completing them, to keep a neat and efficient timeline.

Windows lets you clear the Timeline in different ways, such as a specific activity or  activities of a specific hour, and activities of a specific day.

timeline1

Clearing a Specific Activity from Timeline

To clear a specific activity, first open the Timeline by clicking on the “TaskView” icon appearing in the taskbar, in the screenshot its right of the Cortana icon .

timeline2

After opening Timeline, find the activity you want to clear. You can make use of the search feature on the top-right corner to do so. Once you find the activity you want to delete, right-click on it and simply select the “Remove” option.

timeline3

You will receive a confirmation dialog box, click on the “Yes” button to clear the activity from the Timeline.

Clear Timeline for a Specific Hour

As you can clear a specific activity, you can also clear all activities logged on a specific hour. In the Timeline, find the day you want to clear the hourly Timeline activities on. Now, click on the “See All Activities” link appearing right next to the date.

Note: if you can’t see the link, that means Windows logged less than ten activities for that day. As such, you cannot delete activities for a specific hour. You can only delete activities of the entire day.

In the next screen, you will see all the Timeline activities of that specific day. Find the hour you want to delete activities from, right-click on any activity under that hour and select the option “Clear all from.” In my case I’m deleting all the activities that are logged at 15:00

timeline5


You will see a confirmation window. Click on the “Yes” button and the activities for that specific hour will be deleted.

Clear Timeline for a Specific Day

You can also clear all the activities logged on a specific day. This option is useful when you want to bulk-delete activities.

Open Timeline and find the day where you want to delete the activities. If you think the day you were looking for will be at the bottom of the Timeline, use the scroll bar appearing on the right side. It’s much faster and easier compared to using the scroll wheel.

timeline6

After finding the day you are looking for, right-click on any activity and select the option “Clear all from.” If you’re trying to delete the activities from Today or Yesterday, you will see the option as “Clear all from Earlier Today” and “Clear all from Yesterday.”

In the confirmation window click on the “Yes” button to delete Timeline activities of that day.

Clearing the entire Timeline

Unfortunately, currently theres no option within the Timeline to clear all the activities for last thirty days. However, you can still clear the Timeline activities by clearing the entire Activity History.

Open the settings app. Go to “Privacy -> Activity History.”

timeline7

For whatever reason, you will not see the Activity History Clear button as long as you are syncing your activities to Microsoft Cloud. To see the button you need to disable syncing and then refresh the Settings page.

Uncheck the checkboxs and I disable the Show activities from these accounts, then simply go to another option in the menu such as “General” and then go back to the “Activity History” tab. Without refreshing the Activity History page, you will now see that a “Clear” button appears

Under the “Clear activity history” section will see the “Clear” button. Click on it.

Click on the “OK” button in the confirmation window.

Don’t forget to reselect the checkboxes and show activity sliders or else you’ll lose access your activities from your other Windows PCs.

Windows 10 in Safe Mode

Safe mode, is a limited environment start up method preventing any 3rd party apps, cosmetic features or other tools will be present when you gain access to the PC desktop.
The reduction in booting the extras can assist in determining which application may be causing a slowness problem that you’re experiencing, or if the OS itself is the issue
Safe mode has two “modes”. With or without networking. With networking you have a base system that you can access information from the domain or over your internet connection. Without networking is suited if you fear having a virus/malware fear and don’t want to spread any possible ‘infection”


Starting Windows 10 in Safe Mode from the Settings Menu

At the  Start Screen, press the Windows button and the power button on your keyboard to open the Settings Menu, should this not work, you can enter the menu by selecting the Start button at the bottom of your screen and then navigating to settings.
Once you’re in the settings menu, select Update & security and then Recovery. When the screen throws up the advanced setting of Restart
Your computer will now restart, presenting the Choose an option screen. From here, select Troubleshoot – Advanced Options – Startup Settings, then Restart.
Your PC will reboot again and this time, you’ll be able to choose to start up in either Safe Mode (normal) or Safe Mode With Networking


Starting Windows 10 in Safe Mode from the Sign in screen

If the PC is already up and running you can also reboot using Safe Mode when you arrive at the sign-in screen.
By holding down the Shift button on your keyboard, then select Power and Restart. When your computer reboots, it should open up the same Choose an option screen, as is the case when you restart your computer in Safe Mode via the settings menu.
Once again, select Restart from the Startup Settings menu that you’ll find if you select Troubleshoot; then select Advanced Options and choose either option 4 or press F4 on your keyboard to boot up in Safe Mode, or option 5 (F5) if you need to access the internet in Safe Mode.
If your computer is presenting the black screen of death and you’re unable to do anything at all, hit CTRL, ALT, DELETE to bring up the logout screen, select Restart and ensure you press down the Shift button to take you to the Choose an option screen, from which you can select Safe Mode.


How to use msconfig to launch Safe Mode

A third alternative exists by launching from the command line if you want to avoid multiple steps above, you can instead launch Windows 10 in Safe Mode
Type in msconfig from the search bar, and from the window that opens select the Boot tab. You need to tick  Safe boot and from the radio buttons choose the Minimal or Network to select one of the two earlier described modes

How to exit Windows 10 in Safe Mode

Once you’re in Safe Mode and, hopefully, have corrected the problem with your computer, you’ll want to test it’s worked. To do this, you’ll need to exit from Safe Mode. You can do this once again using msconfig. Head to the Start Menu and type in msconfig to bring up the System Configuration menu.
Go to the Boot option at the bottom of the screen, untick Safe Boot, select apply and OK. you may be asked to reboot for the changes to take effect, or just restart manually to relaunch your computer in normal mode.

Disabling or Enabling touchscreen in Windows 10

Occasionally or due to driver issues, you may wish to disable the touchscreen feature of your device. This is a simple process, and can be easily toggled

In the Search box on the task bar, enter Device Manager, and select Device Manager from the top of the menu choice (it’s still part of Control Panel)

From the opened window, now expand by clicking the select arrow Human Interface Devices, and click to select the HID-compliant touch screen.

Then from the Action Menu option in the upper windows, simply select Disable or enable

device manager

Loss of Internet access when connected on pptp VPN

Due to the recent bad weather we had a number of staff VPN in from home to work. Unfortunately we also received several support issues regarding this, One of which was : “I lose internet connectivity when the VPN is enabled!”.

Now for some who look after security great the phrase ‘tightening it down’ has been heard from other IT providers. But this was an odd issue, mostly because I was using the exact same set up and the connection to work, didn’t interfere with my normal browsing or email.

So a quick look on the internet for some pointers highlighted “split tunnelling”, as an issue  and found out how to navigate Windows 10 around this problem, so thought I’d commit my notes to my blog…

Provided the pptp VPN supplier allows VPN access and uses no other means to stop you accessing the internet, then basically it’s all down to an option with in VPN adapter settings which you should be able to remedy


So via the


Settings> Network & Internet> Change Adapter options

Right click on the PPTP VPN you have the problem with and select Properties

Now Select the Networking tab

Click to highlight the Internet Protocol Version 4 (TCP/IPv4) connection and take the Properties button below

Take the Advanced button

If you have no internet when VPN connects then its most likely that

Use default gateway on remote network is unticked

Ensure it’s ticked, and click OK to get back to the desktop. Next time you connect VPN you should have access to the internet.


Wi-Fi vs. Ethernet: How Much Better Is a Wired Connection

The majority of users believe that WiFi and a cable (Ethernet) connection are one and the same, but that’s simply not the case. Ethernet provides better speed, is low on latency (more on that later),  and a more reliable connection.

WiFi is a lot more convenient than a wired connection without doubt (trust me, being the proud owner of a 25ft long cable, I occasionally use on sites). But there are advantages and disadvantages in using WiFi, which ought to be considered, by users depending on their requirements.

I’m not saying that WiFi is bad, and we should all cable up, can you imagine trying to navigate A coffee shop floor! Just that depending on your needs, cable may be more worthwhile then you’ve considered.  WiFI is without doubt an excellent solution for mobility.

Ethernet speed

Even with the newer standards of WiFi, the speed you get over a connection, is just about 800 Mb/second, and that will vary even with a good connection, compare that with the 10Gb/second that cable can provide, and cable is far more consistent.

All speed is reliant on your internet connection speed, a slow connection won’t be improved with a cable, the bottle neck is the transfer rate. But over a network file transferring of data you’ll notice the difference, as your working on the speed network hardware provides.

For example, when file copying, backing up etc. Ethernet speed shines through, simply because of the transfer rate.

Latency and interference

Or lag as I prefer to call it, is the time taken for traffic to get from its source to it’s destination, this is best demonstrated with the infamous ping command.

WiFi’s mobility advantage is greatly effected as you move about, and as WiFi signals can be disrupted, added to the time it takes being received by the router, latency issues can become a problem after all how many times have you heard user grumbles about the reliability of the WiFi.

Wireless connections are subject to a lot more interference than a wired connection. The layout of your office or home, objects blocking the signal, interference from electrical devices or other Wi-Fi networks—all these things contribute to Wi-Fi being generally less reliable.

This interference can cause a number of problems:

Dropped signals: Occasionally, Wi-Fi will lose the signal and have to reacquire it. This may not be a big deal for daily browsing or even streaming video (which gets buffered on the local device), because the re-acquisition happens quickly. But if you play online games, or processing data over a day, it can get pretty irritating.

Higher latency: Increased interference can mean higher latency, which can be a problem for all the reasons outlined in the previous section.

Lowered speeds: More interference also means lower signal quality, which results in lower connection speeds.

It’s tough to quantify interference, because it tends to ebb and flow–especially if you’re moving around with your device. However, there are things you can do to reduce wireless interference and get the best Wi-Fi signal possible.

When Does It Make Sense to Use Ethernet?

Not meaning to come down too hard on Wi-Fi. It’s pretty speedy, super convenient, and perfectly serviceable for most of what we do on our networks. For one thing, Wi-Fi is essential if you’ve got mobile devices. Also, there are times you just can’t use Ethernet. Maybe it’s too difficult to run a permanent, out-of-the-way cable to the location you want. Or maybe your landlord won’t allow you to run cables the way you want to.

And that’s the real reason to use Wi-Fi: convenience. If a device needs to move around or you just don’t want to run a cable to it, Wi-Fi is the right choice.

On the other hand, if you have a desktop PC or server that sits in a single place, Ethernet may be a good option. If you want better quality streaming (especially if you’re doing it from a media server on your network) or if you’re a gamer, Ethernet will be the way to go. Assuming it’s easy enough to plug the devices in with an Ethernet cable, you’ll get a more consistently solid connection.

Methods of Remote Networking

Remote Networking Introduction.

VPN, RDS and VDI are three of the most famous TLA’s (three letter abbreviations) handed around these days, and are very useful practices for remote working. But what are the advantages? When should you use which one? Following article helps try to explain each method to help you decide, which suits your needs best.

Virtual Private Network.

By far the most common, VPN enables you from your network, to connect to another, for example from home to work, or from one company to another, in a secure and encrypted fashion.

It can be used to access shared folders, drives (if you don’t use cloud) and even devices on another ‘network’ with additional software such as mstsc.exe or the remote desktop applications that are available.
VPN can be client based using the OS, or, third party application usually and app or web page to build and maintain the connection. Or, on a grander scale you can construct a permanent VPN tunnel linking firewalls of one company to another, allowing multiple clients access to resources and different domains.

VPN has a big brother too called remoteaccess, think of this as an always on VPN, very useful, and does away with the manual involvement of having to connect. Largest issue with this method its aimed more at more modern network design IPv6, so if you have any older legacy systems it may be a problem implementing

Advantages, cheap, quick and easy to setup. Able to configure the protocol security type.

Disadvantages, Dependent on set up but you can give an awful lot of network view up. (even if you do your security should restrict wanderers). Can get complex when networks share IP ranges, so you have to NAT Network Access Translate addresses on one side so the masquerade as a different network. For example the widely used common internet facing network IP 192.168.x.x can be referenced as internal network IP 10.10.x.x.

RDS

There’s some confusion with RDS and VDI, so much so people use the term for both, but there is a difference. RDS (Remote Desktop Service) is the replacement for the older terminal services.

So, you can think of it as generating a standard template of a windows desktop machine that will be presented to every user who accesses it. In RDS the template is not designed to be able to be modified by the user, simply just used for their exact requirement.
You give the user a standard interface and applications to work with, with the data paths being set to alternative shared/private drives folders.

In addition to an entire desktop, there are also remote apps which are virtualised applications (Vapps) that can be provided over the remote interface. Suppose for example that 5 users need an invoicing application. Instead of installing on 5 machines create a single Vapp, where each user can call up the application as an when needed.
By centralising the application, there’s only ever one installation to update so that all users are on the latest/same version.

Advantages
Accrssibility to only the software and applications what the user requires, clamps down the security risks. Reduces individual machine set up by supplying that one standard virtual environment.
Disadvantages
Maintaining the template, so that updates are applied to ensure user is on the latest version of the software. Can become painful with multiple / regular updates

VDI

Virtual Desktop Interface, RDS with boots on. VDI creates several templates that can be presented over remote desktop services. But, each template is its own virtual machine for a specific user. VDI takes a little more consideration to setup, as you have to provide and environment that brokers connections, runs the virtual for the user. Depending on your user requirement you may have to deliver a hefty template to a user with lots of RAM, several processors So planning the servers that do this work takes planning and proper consideration.
But done right VDI provides a easy to maintain virtual ecosystem that allows your users to be anyway, connect and have a perfect work desktop delivered to them. There’s no need to buy equipment for users from home, they can use their own home computer to generate a virtualised power machine to work on.

Advantages
Run a PC from a tablet, Windows android or ios device. User has the control you allow to add additional software or to update existing installation. A true work anywhere solution, incorporates BOYD
Disadvantages
Initial cost and time in the setup is the biggest disadvantage.

Connectivity
If your working remotely your connectivity is imperative. I’ve encountered issues with users where their home broadband provider doesn’t allow for specific types of VPN, so ended up having to work around their issue by creating or using an alternative VPN, great it cures their problem, but it more to maintain.
VPN short term is okay over a mobile type 4G but remember signal changes as you move around, it may be difficult getting a good stable connection in the middle or nowhere, or in the middle of busy large city and peak times.
A good steady connection for RDS and VDI is vital, failing to do so provides a frustrating slow and regularly dropping out connection for the end user. Plus, a lot of frustration for IT having to unlock / free up dropped virtual sessions on the server.

Turn off WiFi when connected via Ethernet cable


Okay we’ve all been there, your trusty laptop in hand in the office, only to find the Wi-Fi is down, or it’s a little shaky in that side of the building and you have to swap to a Ethernet cable to maintain a good connection.

Easy enough plug it an and away you go.. But, although Windows 10 will simply swap to the Ethernet cable to work, Wi-FI still runs chewing away at your precious laptop battery life

Luckily you can configure your laptop to turn off WiFi automatically when a Ethernet cable is connected (Note dependant on the network adapter in the laptop) and save a little more power to prolong your use

Best done before the event as always, but ensure you’re on the WIFI when you configure your laptop adapter to do this

From the System tray right click on the WiFI/Network icon and select Open Network and Sharing Centre. In the Active networks click on the wi fi connection to open the status window

wifi1

wifi2

Click on the Properties button to get the current settings of the adapter, under the networking tab you’ll see the following, click the Configure button to get the fill properties of the adapter

wifi3

Now click on the Advanced tab, the property look for Disable Upon Wired Connect, and ensure its set/changed  to Enabled for the value

wifi4

IMPORTANT Should the Disable Upon Wired Connect option not appear, it’s most probable that your network adapter doesn’t support this feature.

Finally, click OK button, and presto all sorted. From now on, whenever you connect an Ethernet cable to your laptop, Windows 10 automatically turns off the Wi-Fi saving precious battery life.

Linx10v64 Review

Late in 2016 Linx launched the Versae range of tablets in a 10inch  and larger 12inch model. But, these new systems presented as a 2-1 model, (as were the older Linx10 and 1010b m10v64box
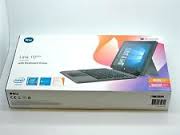
odels), have a sharper more professional look and feel to that of the older model. Many of the websites seem to confuse this model with the 1010b, and the 10v64 and it’s a very different beast indeed.

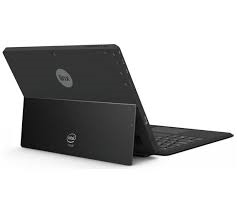
As gone is the rubberised no slip surface on the back of the tablet, now replaced with sturdy black aluminium. The fold out or origami keyboard stand has gone, and is now supplied with a separate click connect keyboard a la Surface, and the unit having its own kick stand, mimics the classic Microsoft Surface look and feel styling overall.

If you get a hold of one of these machines from Exertis, you won’t be disappointed. Provided you know what you’re taking on, as although it has the appearance of a Surface Clone, it most certainly isn’t one. The V64 is the first clue, the system comes with limited maximum 64Gb on board storage, but does allow for some expansion by means of the micro SD card slot.  The system utilises the last of the Intel Atom processors in a quad core configuration, which gives the little machine quite a boost operationally with fast RAM, but low power use. But, the processor is also a nail in the coffin of the device, as Intel have now ceased work on the Atom processor, and is no longer being manufactured by Intel.


With Microsoft’s Edu push for the Windows 10S and cheap systems, it’s a shame the 10v64 is already ‘out of date’, as its specifications are great for a good solid base computer for Education needs. The 10v64 has the styling and look of the Surface, but the bargain price comes with a few limitations. Measuring your requirement, means you may be able to have this Linx as your mobility device and yes, it can replace your laptop (depending on your circumstances), all without burning a hole in the pocket/purse strings. It’s an ideal take to school/college device, and for a good solid mobile device for work.

Setup/OOB

The traditional blue study cardboard box contains the tablet unit, and keyboard, with a box for the power supply and USB to mini USB adaptor. The power supply is now an all in one affair, with no click assembly as did the older models. A gripe I have is that the length of the charger is that supplied to all tablets (too short), fine on the desktop power supply, but will have a struggle if you need to go to the floor for a power outlet. But, the 2in1 was not designed to be plugged in permanently, it’s a device for being on the move, so shouldn’t grumble about that point.

First hurdle you’ll  probably encounter is the Windows 0/S upgrade, as the system comes with 1511 version of Windows 10. Not that the upgrade is not smooth to 1607 or 1703 for that matter, it’s  just getting to the upgrade download that’s a bit of an obstacle. The Linx settings not to download on specific battery charge % means that you’ll have to fully charge, and alter the battery saver settings to get the ball rolling on the upgrade. Once upgraded there’s no issues with Camera, blue tooth etc. Hence the smooth transition I mentioned.

The second hurdle will be the SD expansion, remember to reboot after you insert the SD card so it’s recognised by the system. Having got over these two minor obstacles you’re up and away.

Unlike the original 8 and 10 tablets that the company launched, the Versare doesn’t come with Office 365 included (no doubt Microsoft are weaning users off the old style personal edition). Instead, on install you’ll see three blank tiles that act as shortcuts to the store, so you can download the Word, Excel and PowerPoint apps to use if you have a 365 account already. In a way, this is advantageous disk space wise, in not having to install the full Office suite. But, the Office apps are more than adequate for use on the move for word-processing and spreadsheet use, and are upgraded regularly adding extra features.


The device

Having 4GB RAM is a first for Linx, and lets the Windows 10 Home software it comes with work fine, a definite bonus for the more power hungry old tablet users that are out there, capable to multitasking around four applications with no noticeable degradation to performance.

kickstandThe 10v64 fits nicely in the sub £200 bracket, obvious hardware restrictions were used in its manufacture. For example, the front and rear built in webcams are both 2 mega pixels not exactly the best, but sufficient for video calling and taking the occasional snap if needs be. The 10″ touchscreen is 720 standard HD 1200×800, again not the highest quality, but provides a good clear quality image for the desktop use and general viewing purposes, even for long periods of time.

The tablet unit itself is a weighty affair (remember I’m used to working with the smaller 8″ tablets) not only by its increased size, but the aluminium body and kickstand that allows the tablet to be used in laptop mode, so this in my opinion is a machine for using more in laptop mode remotely, rather than tablet style wandering about, as it will become unwieldy after a time.

Under the hood beats one of the last and best Atom processors the x5-Z8300 a 64bit Quad core solid heart. You’ll  find that the Linx can work well in desktop mode and handle a moderate amount of multitasking in its stride. The battery’s no disappointment, with you getting a good 5 hours processing time out of it before the sirens start to wail J which isn’t that bad for work purposes, as you can sneak in a recharge top up easily at lunch whilst in use.

The charger has gone back to a one-piece micro usb affair, and the device does take a little time to re charge fully.


Additional ports

Another difference between the 1010 and the 10v64 is the addition of a full sized USB 3 port on the unit.

10v64 portsThere’s also the standard Linx mini USB port (with an adapter supplied) enabling two full size USB ports to be available. Which is handy for a mouse, and connecting to external storage for example. The mini HDMI port is also available, allowing the unit to output to another screen if so required.


Keyboard

The system comes with a click connect keyboard now, much like the Surface, with a good positive click connection. Overall the keyboard (which is obviously reduced by the 10 inch size) works well, and doubles as a folder over cover.

10v64keyboardThe ability to use Fn key and alternative keys marked in the classic blue colour gives you the missing additional characters, and a number pad replication. The keyboard also contains the central mouse pad. Never been a great fan of mousepads, but once you get used to the occasional quirk, (moving mouse pointer and hitting the left/right button area) this works okay too. But for heavy mouse work, I’d recommend you make use of the USB and plug in an external one, to save your sanity.


Upgrade-ability?

My device was recently upgrade to the 1703 Creators Edition of Windows10 and everything ran fine with the update, and not one of the “this application has been removed as it’s  no longer compatible  messages. Hardware wise you’re  stuck with the 4GB DDR3 SDRAM (which is quite nippy) and the 64gb internal. The SD card can be expanded to allow another 200gb.


In the field?

So, is this a tablet that can replace your laptop?  It certainly can for me!  Both work and home computing for me is heavily reliant on cloud, using the 10v64 was no different to me using the laptop/notebook as that’s  where much of the software I use is held. Basically, give me tablet and a fast internet connection to sail her by and I’m  fine.

10v64modelThe 4GB memory and what I can only say is best of the Atom processors it’s  a Quad core! Really work together well for locally installed applications, there’s very little lag in launching and running applications. Going through updates is much easier with SSD as I’ve found.

The screen quality is good clear with a crisp resolution and usable in bright light. With the kick stand you only get two viewing angles 40 and 80 degrees but a desk the angle is sufficient to allow the screen to be visible without too much glare from windows or overhead lights, so is fine for working at the desk, at a table or a good flat surface somewhere if you’re out and about.

The keyboard arrangement works well uses a powerful magnetic catch that connects two prongs on the top of the hinge  to a single opening on the bottom edge of the tablet screen. A small connective strip between the prongs forms the electrical connection between the keyboard and the screen. The keyboard connects and more importantly stays connected well without the need for a release clip/button, and if you need to move the keyboard folders over the screen to make a good cover.

On the whole this is a great little machine, now the alternative to my use of the 8″ tablet work working on the move. The 10v64 is well built, works well and a solid reliable device